Adding a Project
How to create a Project for "our work" section
Introduction
This guide will walk you through the process of adding new projects to the website's showcase portfolio (Our Work).
Accessing the Project Addition Form
- Log in to the Arkigroup backend using your credentials.
- Create a new Project
-
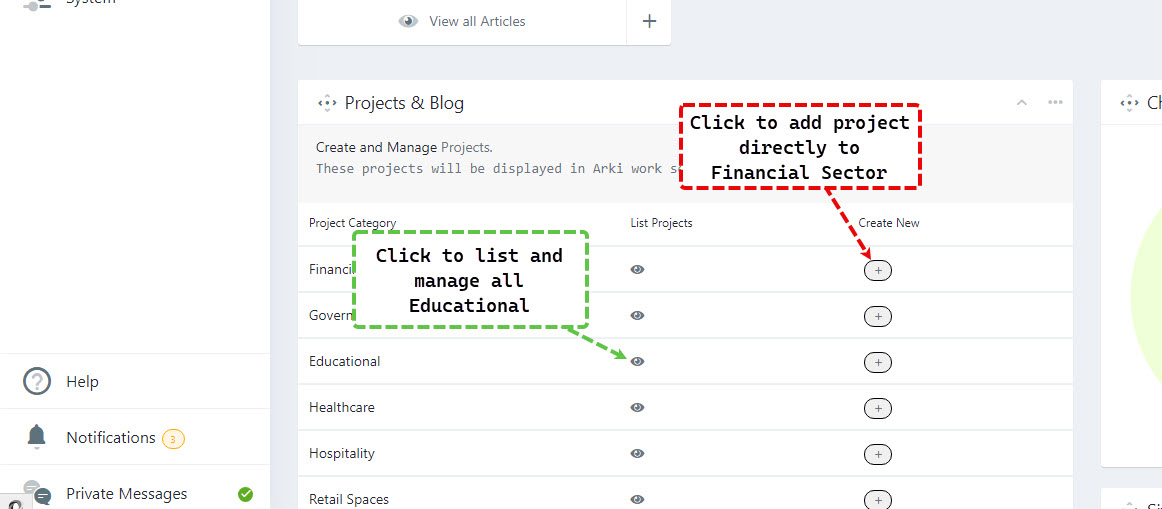
Method 1 (quick & recommended)
- From you dashboard scroll to Projects & Blog then press the (+) plus button next to the relative section that you want to create the Project for. This way you will be redirected to the Project form with the proper section being pre-selected.
-
Method 2
-
Navigate to: Sidebar → Content → Add New Article (or the plus button)

-
From category the category filed on the right sidebar select the category related to the Project section (ex: -Financial Sector)
-
After selecting the intended section you will be redirected to the addition form.
-
-
Project Fields
The following list provides an explanation of the purpose of each field in the project addition form. Familiarize yourself with the purpose of each field to ensure accurate and comprehensive data entry.
-
Title: Specify the main title of the project.
- Enter a concise and descriptive title that accurately represents the project. This title will be displayed prominently in the project listing.
-
Intro Image: Set the image that will be displayed in the projects listing.
-
Upload an image that best represents the project and will be displayed as a thumbnail or introductory image in the projects listing. Choose an image that is visually appealing and provides a glimpse of the project.
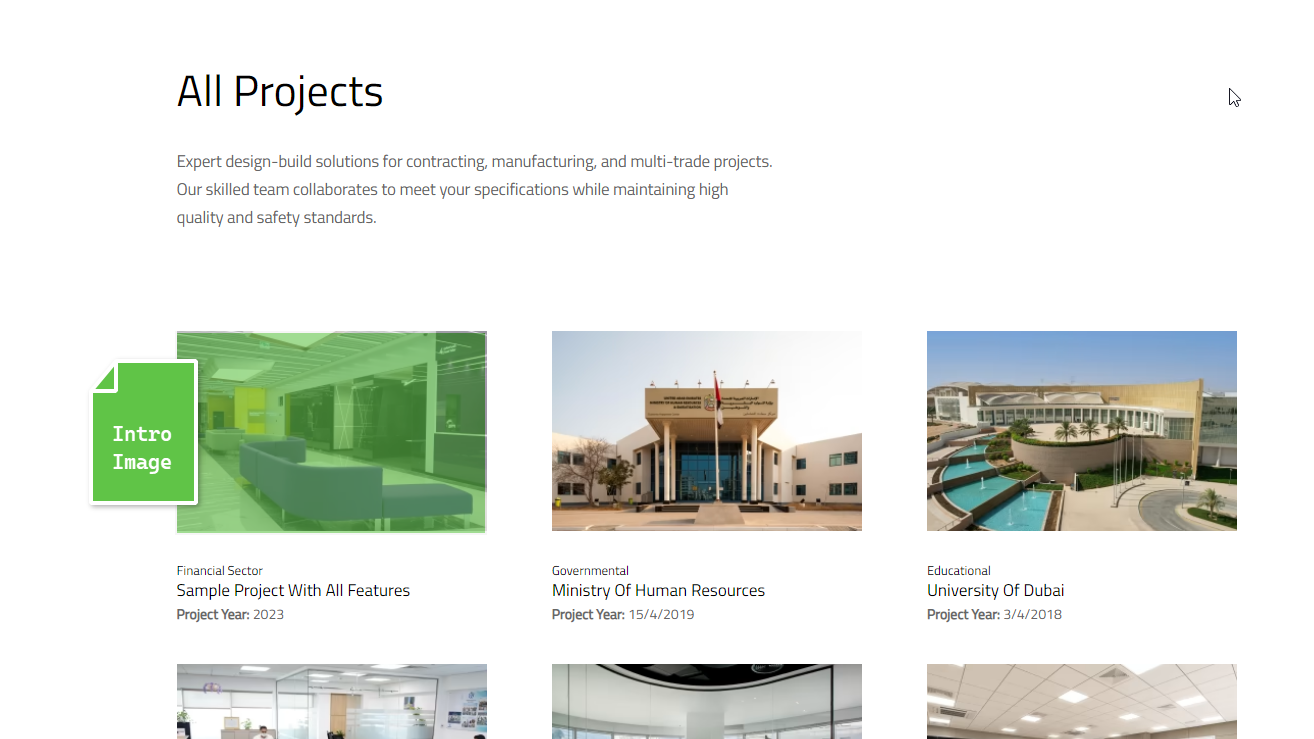 Image into displayed in project listing page
 -
-
Project Sector: Select the sector that best represents the project.
- Choose the sector from the provided options to categorize the project accurately. Options include Financial Sector, Governmental, Educational, Healthcare, Hospitality, Retail Spaces, Work Spaces, and Residential.
-
Work Area & Services: Specify the work area and services associated with the project.
- Select the checkboxes that correspond to the work area(s) and services provided for the project. Work area options include Contracting, Design, Manufacturing, and Trading. Service options include Acoustic Partitioning Systems, Design, Fit-out and Contracting, Furniture and Flooring, Glass & Aluminum Retractable Systems, Joinery and Metal Works, and Technology Equipment and Networks.
-
Project Date: Enter the date when the project started or commenced.
- Provide the start date of the project to indicate its timeline and chronology. This field is critical for ordering projects by date.
-
Featured: Highlight the project in the portfolio.
- Check this box if the project should be given special prominence in the portfolio. It will stand out among other projects.
-
Content: Describe the project in detail.
- An HTML text that can be used to provide a comprehensive and engaging description of the project, highlighting its key aspects, challenges, and notable features.
-
Project Manager: Assign a project manager to oversee the project.
-
Select a user from user list database.
-
-
Client: Identify the client associated with the project.
- Enter the name of the client for whom the project was undertaken.
-
Location: Specify the location of the project.
- Enter the city or region where the project is located to provide geographical context.
-
Size: Indicate the area size of the project.
- Enter the size of the project in square feet or square meters to give an idea of its scale.
-
Completion Date: Enter the date when the project was completed or is expected to be completed.
- Provide the date when the project was finished or the anticipated completion date if it is still ongoing.
-
Project Team: Add team members involved in the project.
- Enter the names of team members who contributed to the project. This is a simple text input.
-
Images: Upload main project images for the header slider.
-
Click the "+" button to add another content image.
-
Click the "-" button to delete a content image.
-
Use the drag button to reorder the content images.
-
-
Content Images: Upload additional images to display after the project description.
-
Click the "+" button to add another content image.
-
Click the "-" button to delete a content image.
-
Use the drag button to reorder the content images.
-
-
Brochure: Attach relevant documents, such as brochures or case study files.
- Click the "Upload" or "Choose File" button to select and attach any relevant documents related to the project, such as brochures or case study files.
-
Website and E-Mail: Provide the client's website and email address.
- Enter the client's website URL and email address, if available.
-
Services: Specify the services performed during the project.
- Select the checkboxes corresponding to the services offered for the project. This provides an overview of the services provided in relation to the project and display Service name with a predefined icon.
-
Additional Info: Add any extra information or details about the project.
- Use this field to include any additional text or information that is relevant to the project but not covered by the other fields. This will be displayed before the end of the project page and can improve the overall visual look of the project page.
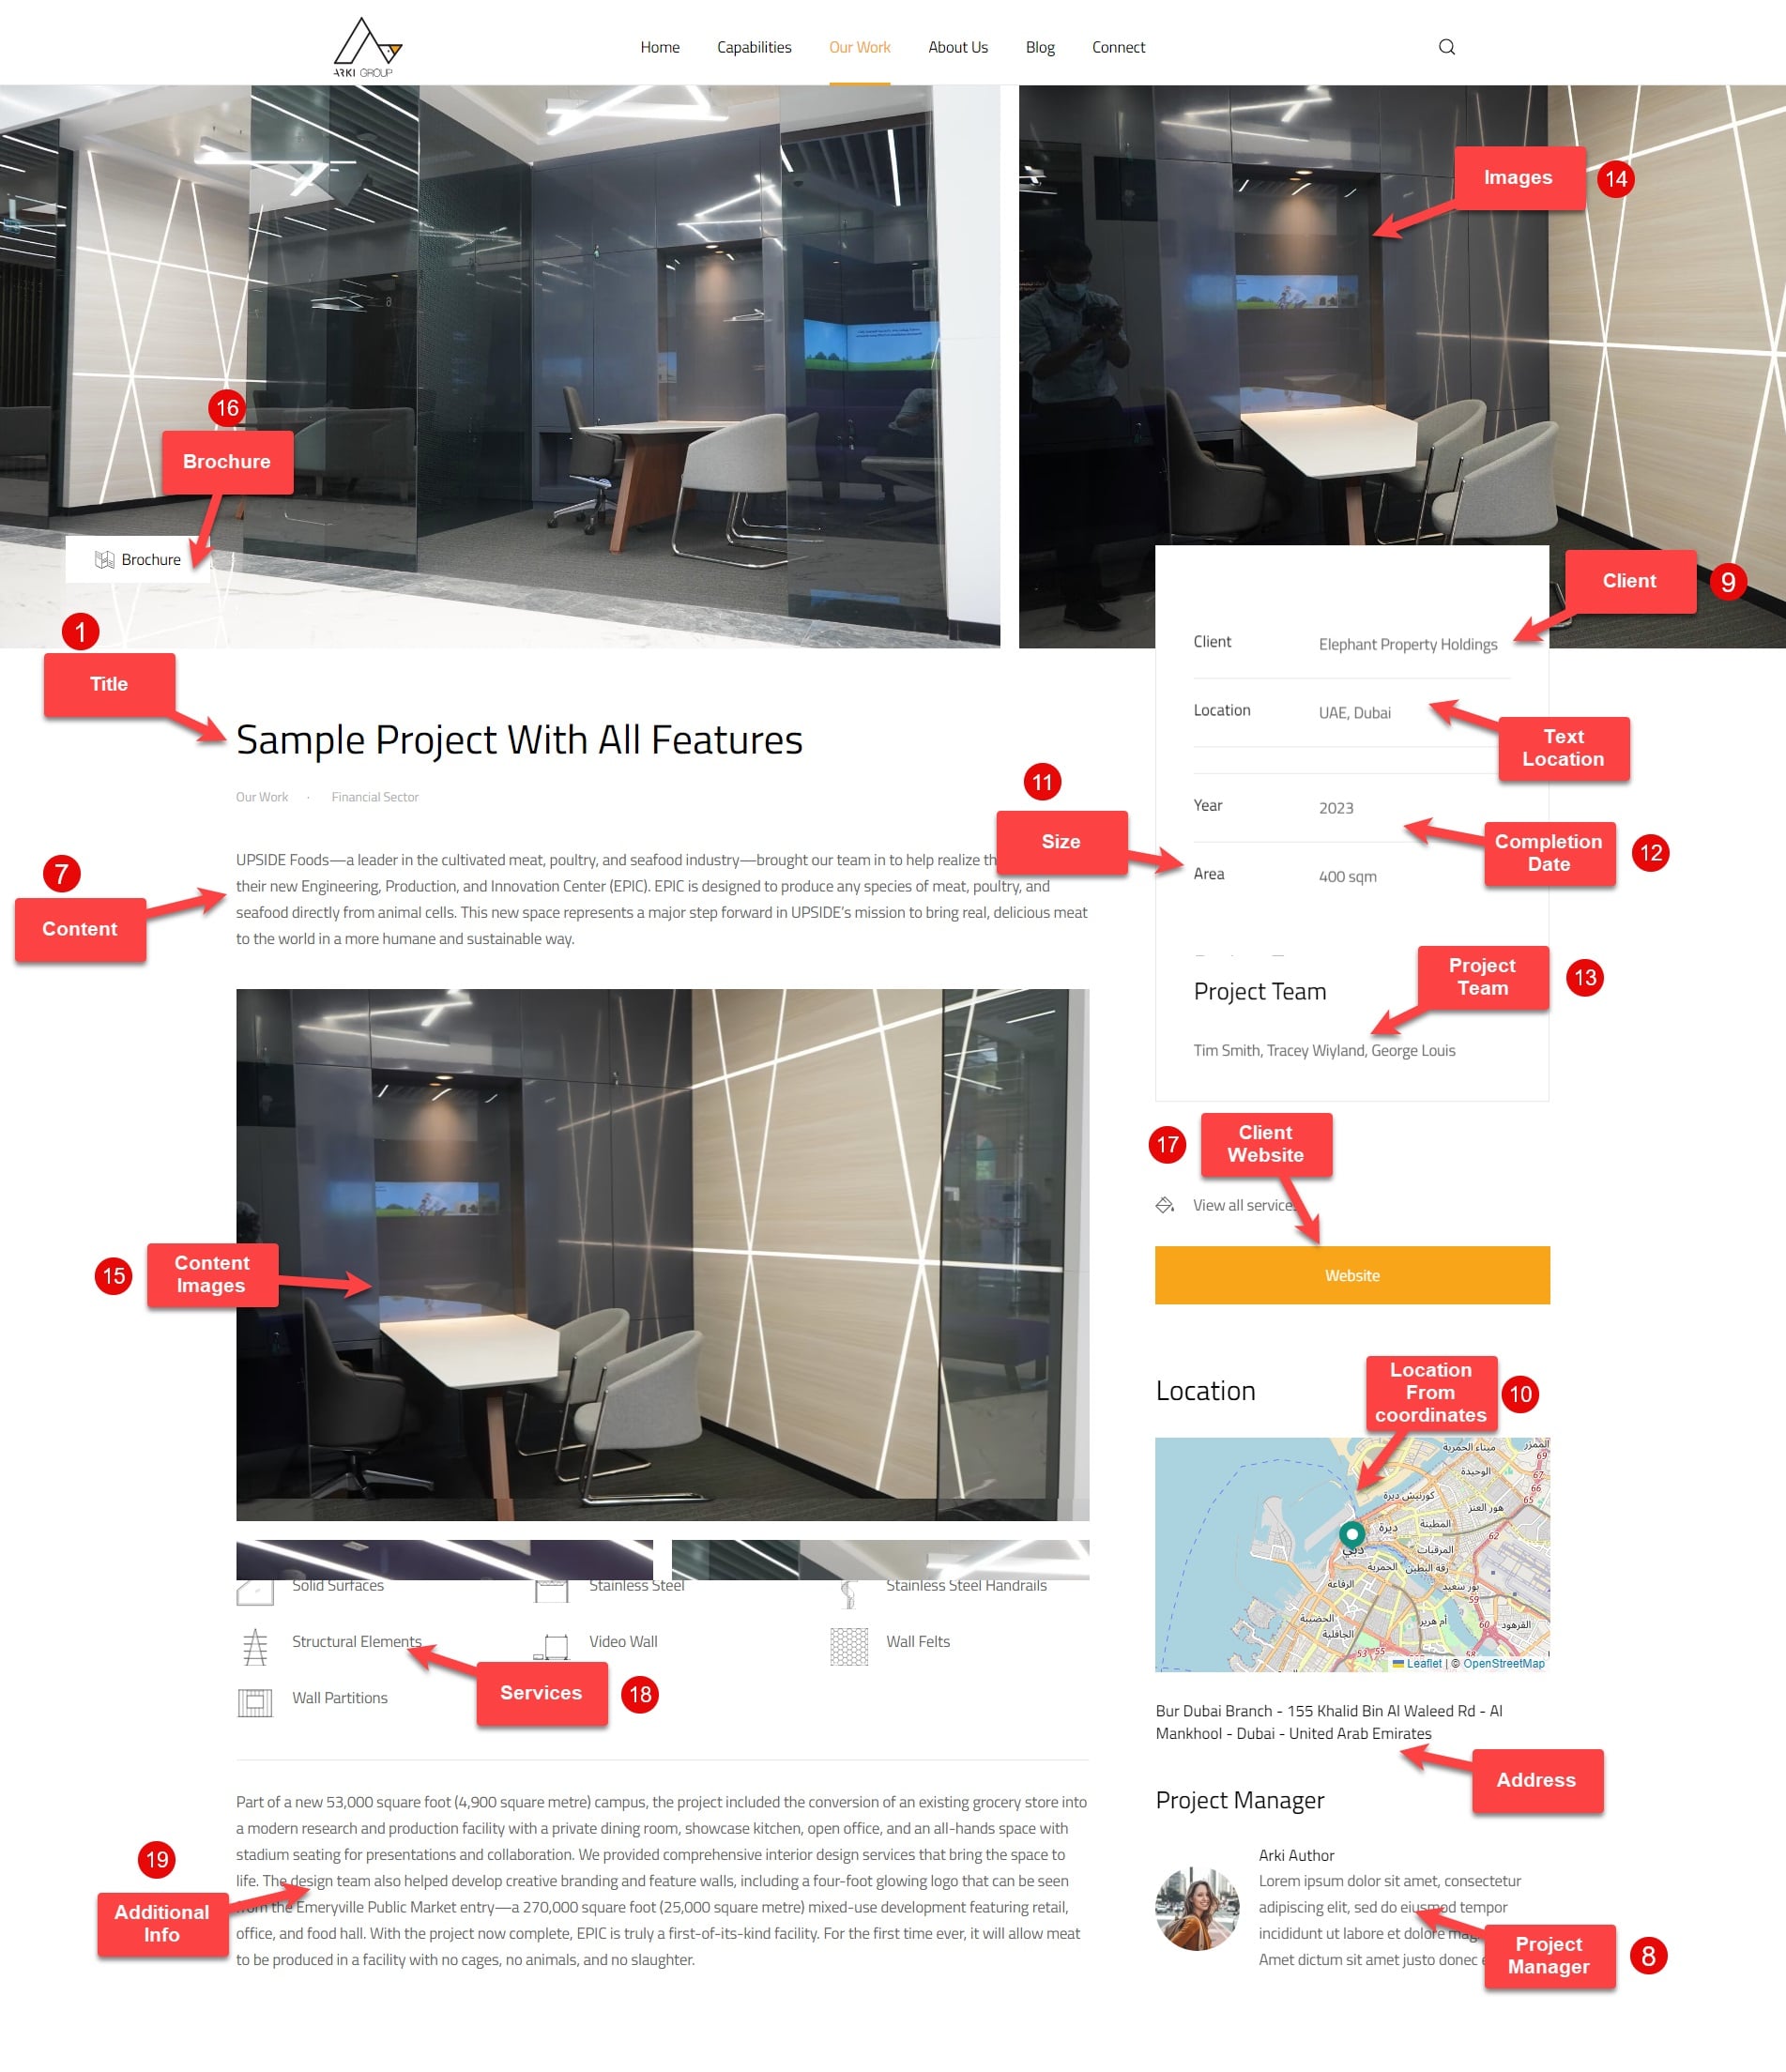 A screenshot showing how a project's detail page looks like if all field were filled
Saving and Submitting the Project
- Review the entered project details for accuracy and completeness.
- Click the "Save" or "Save & Close" button in the top toolbar to save the project and add it to the portfolio.

Best Practices and Tips
In Origen, you have the option to save contents as unpublished before publishing them on your website. This feature allows you to preview and double-check the content of an content before making it visible to your website visitors. Following this best practice ensures that your published contents are accurate, complete, and error-free. Here's how you can leverage this feature:
-
Unpublish the Content: In the "Publishing" tab, set the "Status" dropdown to "Unpublished." This will prevent the content from being visible on the website until you choose to publish it.
-
Preview Using the Origen Toolbar: After saving the content, take advantage of the Preview button in the Origen toolbar. Click on the Preview button, which typically looks like an eye icon, to open a modal window displaying a preview of the content. This allows you to conveniently review the item's content, appearance, and functionality without navigating to the frontend of your website.
-
Make Further Adjustments: If you identify any issues or areas for improvement during the preview, close the preview to go back to the Origen administrator backend and edit the content accordingly.
-
Repeat the Process: Review and edit the content as many times as necessary until you are satisfied with its content.
-
Publish the Content: Once you are confident in the content's quality, open it for editing in the Origen administrator backend and change the "Status" dropdown to "Published." Save the content to make it visible to your website visitors.
To see a visual demonstration of these steps, you can watch the following video
Conclusion
Congratulations! You have successfully learned how to add new projects to the portfolio section of Arkigroup's website.